Create a workflow
Workflows automate data transformation in Rational AI. This guide covers creating, configuring, and testing workflows that convert raw data into AI-ready knowledge using AI.
Workflows automate the transformation of raw data into AI-ready knowledge. They extract key information, augment it, identify connections between data points, and structure everything into a queryable knowledge base that your AI applications can use.
Prerequisites
Before creating workflows, ensure you have:
- Permissions to access to the AI Control Room Settings area
- A Knowledge base created (workflows operate on Knowledge bases)
- Python and
uvpackage manager installed (installation guide)
Access the workflow interface
Navigate to Settings → Workflows from the left sidebar. This is the central workspace for creating and managing workflows and processing rules.
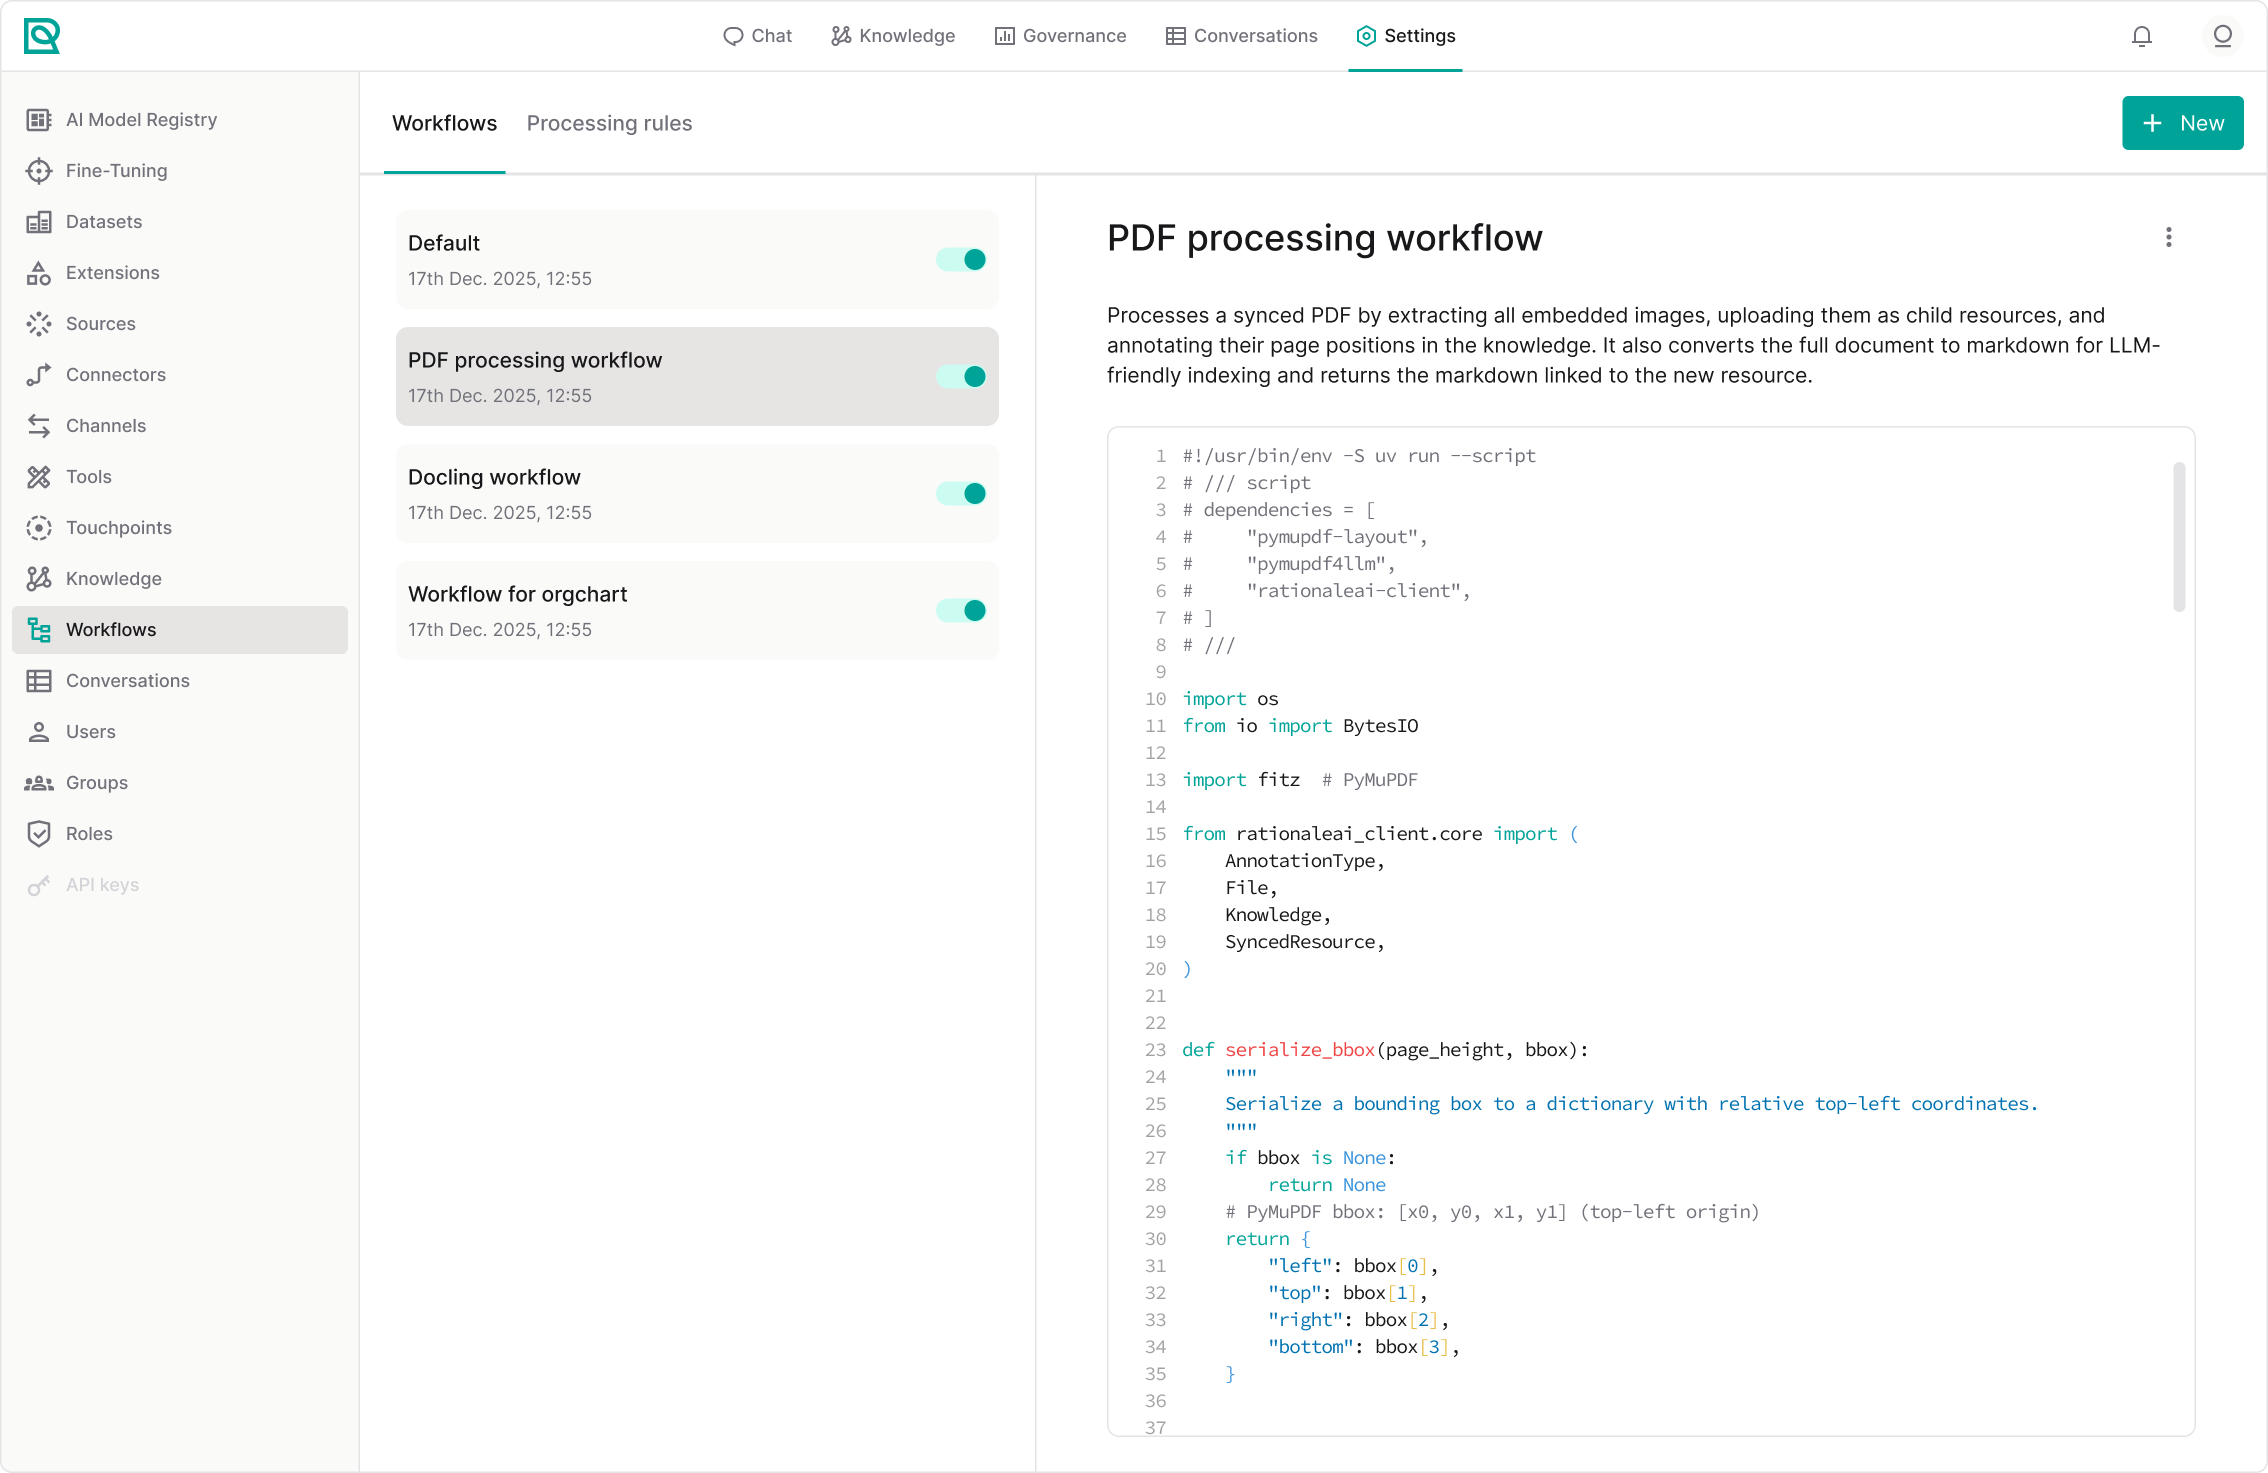
Workflow list
The left panel displays all workflows that have been created in your environment. For each workflow, you can see:
- The workflow name.
- An enable/disable toggle.
This list gives you a high-level view of which processes are active and which aren’t.
Workflow editor
When you select a workflow from the list, its details are displayed on the right side. This is where you define how your workflow behaves.
The editor includes:
- The workflow name and description.
- The editable logic or configuration area (JSON or script-based input).
- An action menu that allows you to:
/* * Open the workflow in the Lab. */
- Edit its logic.
- Delete the workflow.
Creating your first workflow
If you’re a new user, the workflow page may initially be empty. In this case, you can create your first workflow in a few simple steps.
- Click the + New button in the center of the page.
- Enter a clear and descriptive name: for example
PDF processing workflow. - Optionally, add a short description explaining the purpose of the workflow. This is strongly recommended for long-term maintainability.
- Enable your workflow from the list and you’re done.
Extraction capabilities
Between the Description field and the Code editor, the New workflow and Edit workflow modals include an Extraction capabilities section. This is where you tag a workflow with the kinds of content it pulls out of a document — such as Images, Tables, or Annotations. The tags don't change what the workflow does; they describe it, so the platform can surface the right workflow in the right place.
Select capabilities by toggling their chips:
- Choose any number. Click a chip to select it, click it again to clear it. A workflow can carry no capabilities, exactly one, or several.
- Saved with the workflow. Your selection is included in the payload when you click Add, or Save when editing.
The available capabilities aren't hardcoded in the interface — Rational AI fetches the master list (Images, Tables, Annotations, and any future additions) from the backend, so the set can grow without a front-end change.
On the workflow detail view, the capabilities you assigned appear again as read-only, non-clickable chips directly below the description — a quick summary of what the workflow is tagged to extract. To change them, edit the workflow and toggle the chips.
Capability tags also filter where you pick a workflow. When the context requires a capability — for example choosing a workflow from the Image tool settings, or running Auto-annotate images — the list is filtered to show only workflows that carry the matching tag, so you can't select one that can't do the job. Where no specific capability is required, every workflow is listed.
Workflow logic
Let's create a simple, yet effective, workflow that takes as input a lorem-ipsum markdown file, creates a Rational Resource associated with it and performs chunking and embedding automatically, to allow semantic retrieval in a RAG scenario.
The workflow business logic is defined as below:
#!/usr/bin/env -S uv run --script
# /// script
# requires-python = ">=3.12"
# dependencies = [
#     "rational-client",
# ]
#
# ///

from rational_client.core import (
    Knowledge,
    File,
)
from rational_client.utils import run


def process(document: File, options: dict):
    # Read document content (bytes)
    content = document.get_data()

    # Convert to string (assumes content is textual)
    text = content.decode("utf-8")

    # Get the Knowledge instance this document belongs to
    knowledge = Knowledge(document.knowledge_id)

    # Create a new Rational Resource in the Knowledge Base
    new_resource = knowledge.create_resource(
        name=document.name,
        category="document_category",
        tags=["some", "tags"],
        file_id=document.id,
    )

    # Return the content for chunking and embedding (optional)
    return {str(new_resource.resource_id): text}


run(process)
Let's break it down:
- the workflow starts with an incipit which species the script dependencies (in the PEP 723 format): this allows to specify arbitrary script dependencies in your workflow, no whitelisted packages!
- at the bottom we can find the workflow entrypoint, the
run(process)function, which is an utility function to invoke theprocessfunction defined - the workflow business logic is specified in the
processfunction: it takes as input the document over which the workflow is applied, and some options that might be used to store values later used in the workflow code - the workflow typically might invoke operation on Rational AI through the
rational-clientpackage, such as retrieving a Knowledge handle, i.e.knowledge = Knowledge(document.knowledge_id) - the workflow might return a dictionary specifying the Rational Resources created and their textual content, i.e. text/markdown, to be automatically chunked and embedded according to the Knowledge settings
Testing your workflow locally
It is convenient to perform workflow development on your local machine, before using them into Rational AI. This is not only possible, but also encouraged, as it allows to use your favorite IDE and debugging tools.
To run your workflow locally, you just need to make it executable and pass a properly formatted input as argument to it.
Let's suppose to call the above-defined workflow as lorem-ipsum-wf.py. We can make it executable by running the command:
chmod +x lorem-ipsum-wf.py
Then, we need to prepare a Json file as input, let's call it workflow_input.json. This file needs to have this structure:
{
    "knowledge_id": "<YOUR KNOWLEDGE ID>",
    "path": "<YOUR DOCUMENT FILEPATH>",
    "options": {}
}
Once configured, we can pass the workflow_input.json file as input to our workflow, as:
./lorem-ipsum-wf.py workflow_input.json
to test our workflow locally.