Configure touchpoints
A touchpoint is the bridge between one of your Knowledges and the people (or systems) asking it questions. It decides two things: who is allowed to reach the agent, and which tools the agent may use when it answers. This guide walks through the touchpoint configuration panel and the Tools tab.
A touchpoint connects a Knowledge to the outside world. It carries the access settings for the agent and the set of tools the agent is allowed to use when answering. Those tools come from your installed MCP servers — MCP (Model Context Protocol) is the standard Rational uses to let an AI agent call out to external capabilities like search or database queries. When you create a Knowledge, Rational also creates a default touchpoint for it, which you then refine here.
Prerequisites
Before you start, make sure you have:
- Administrative access: an account with touchpoint management privileges.
- A touchpoint to configure: for example the default touchpoint created with your Knowledge.
- At least one MCP extension installed: a touchpoint can only offer tools that an installed MCP server exposes (for example the
rational-knowledge-ragextension). See Manage extensions if you need to install one.
Open a touchpoint
Go to Settings → Touchpoints and select the touchpoint you want to configure. This opens the configuration panel, where access settings live, alongside the Tools tab.
Create a touchpoint without naming a model and it takes your platform's default Conversational model — the one set under Settings → AI Model Registry as "Default model for conversations" — and adds it to its own list of allowed models. The rule lives in the backend, so it applies equally to touchpoints created through the API. A model you choose explicitly is always kept, and existing touchpoints are left exactly as they are; change the platform default and only touchpoints created afterwards pick it up.
Edit the system prompt
The System prompt is the standing instruction the agent follows on this touchpoint. Two controls sit beside the field, and both matter once a prompt grows past a few lines:
- Show unsaved changes switches the field into a diff view, comparing what's saved against what you've typed. On a long prompt this is the difference between knowing what you changed and hoping you remember.
- Expand editor gives the prompt a much taller editing area, hiding the surrounding fields while you work.
A touchpoint with enough history offers to replay your change against its real past conversations when you save, so you can see what came out different before your users do. See Test a touchpoint change.
Control who can reach the touchpoint
Use this to decide whether someone must sign in before they can talk to the agent. By default they must.
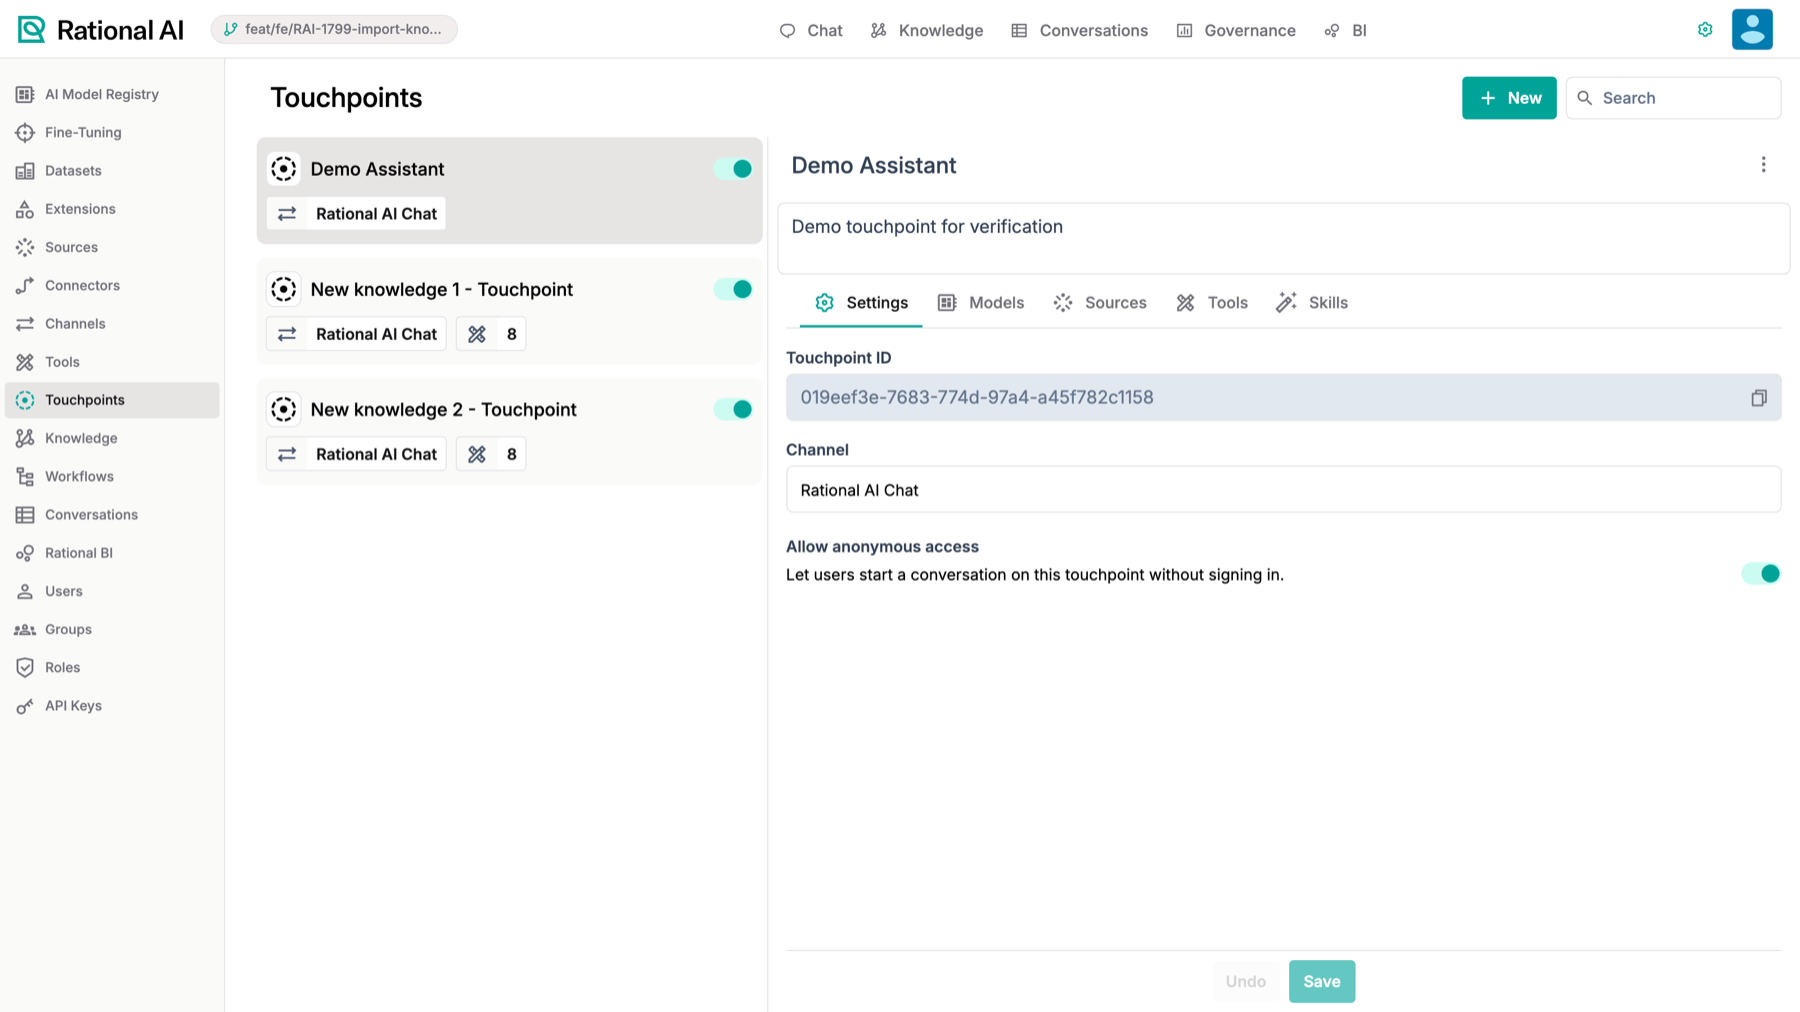
The Allow anonymous access toggle in the touchpoint configuration panel.
- In the configuration panel, find the Allow anonymous access toggle.
- Turn it on to let anyone reach the touchpoint without authenticating, or leave it off to require sign-in.
- Save the touchpoint to apply the change.
Only enable Allow anonymous access when the touchpoint is genuinely meant to be reached without sign-in, such as a public help assistant. Once saved, the setting persists with the touchpoint.
Work with tools
The Tools tab is where you choose exactly which capabilities the agent can call. Open it to see your tools organized in a nested view rather than as a flat table:
- One card per MCP server.
- Under each server, a
CONFIGURATIONlist. A configuration is a named, reusable set of settings (parameters and sources) for that server. - Each configuration expands to show the tools added under it, listed as alias · tool name · description.
A configuration that has no tools yet is marked with an Unused chip, so you can spot at a glance where nothing has been wired up.
Reading the two dropdowns
Two pickers drive everything in this tab. Both render as grouped, styled lists so you can see where each option comes from.
- Add tool… shows a group header per MCP server (with the extension's icon) and the tool rows indented beneath it. For example, the
rational-knowledge-ragextension appears under a RAG MCP server group with its tools listed below:rag_query_simple,get_resource,get_user_context,get_schema,execute_query,list_databases, andrag_query_graph. - Add MCP server configuration… offers + Add new configuration at the top and then lists the available configurations, each shown with the server icon and an expand chevron.
Decide when a tool needs confirmation
Choosing which tools an agent may call is one decision; choosing which of those calls a human has to approve first is another. The second one sits at the top of the same Tools tab, under When to ask for confirmation — "Before running a tool, the assistant can ask the user to confirm."
- In the Tools tab, open the When to ask for confirmation dropdown.
- Choose the policy for this touchpoint:
- Never — tools run without asking.
- Smart — only for sensitive tools (recommended). The default: read-only tools run straight through, sensitive ones wait.
- Always — ask before every tool.
- Save the touchpoint.
Under Smart, what counts as sensitive is set per tool. Each tool row carries a Sensitive badge you can select to add or remove, whatever the current policy is. Hovering it tells you where the current answer comes from — your own override ("You marked this tool as sensitive.") or the MCP server's declaration ("Declared as sensitive by the MCP server.", "Not declared as sensitive by the MCP server.").
When a gated call comes up, the chat pauses and shows an approval card above the composer; the tool runs only once the user approves it.
An MCP server declares its own tools read-only or destructive, and Rational AI follows that declaration until you say otherwise. Once you have toggled a tool's Sensitive badge, your choice is what counts — including across extension re-syncs, which would otherwise reset the tool to whatever the server currently claims.
Add a single tool
Reach for this when you want one specific capability with parameters tuned exactly how you like.
- In the Tools tab, open the Add tool… dropdown and select a tool from its MCP server group.
- In the Add tool dialog, set each parameter's mode using its Default / Auto / Manual dropdown. Default inherits the configuration's value, Auto lets the agent decide at answer time, and Manual lets you fix the value yourself.
- To undo a change to any parameter, use the revert-to-default button next to its mode dropdown. The button disables itself once the parameter is back in default mode.
- Select Confirm.
Fill a Manual parameter from the conversation
A Manual parameter doesn't have to be a fixed literal. It can reference a value carried on the conversation, resolved at the moment the tool is called:
${userStore.<key>}— a value from the conversation's user store.${system.<key>}— a value from its system store, which is set when the conversation is created.
The practical difference between the two is when you can write them. The system store is fixed at creation, so an integration that embeds a chat surface it doesn't control the bootstrap of can't use it; the user store can be written afterwards, so it works in that case too.
A parameter set to Manual is stripped from the tool schema the model is shown. The model never sees it, so it cannot set it, alter it, or be talked into changing it — the value is substituted after the model has decided to make the call.
That makes it the right mechanism for the caller's identity, a tenant reference, or a capability issued by the host: anything where letting the model supply the value would be the vulnerability.
The alternative — having the agent read a value with a tool like get_user_context and pass it back as an argument — routes exactly that value through the model, which is the exposure Manual parameters exist to avoid. If a value matters for authorisation, it belongs in a Manual parameter, not in the conversation.
When the server has only one configuration, the configuration dropdown is hidden in the Add tool dialog — there is nothing to choose between.
Bulk-add a configuration's tools
When you trust a configuration's defaults and just want everything it offers, add all of its tools in one action instead of picking them one by one. There are two entry points:
- Pick a configuration in the Add MCP server configuration… picker to add all of its tools at once.
- Use the Add all tools action on a configuration row, found in its
⋮menu.
Each tool is created with no parameter overrides, so it inherits the configuration and tool defaults. Any required field that has no default falls back to LLM Auto — exactly as if you had added the tool individually and left its defaults untouched.
When the bulk-add finishes, a toast confirms the result, for example Added 2 tools.
Tools already present are skipped (deduplicated by tool id). If a configuration is empty or already fully added, nothing is created and you get an info toast instead. Partial failures report counts without losing the tools that succeeded.
Add a new MCP server configuration
Create a configuration when you want a named, reusable set of settings for a server — for example one configuration pointed at a specific data source, ready to drop tools into.
- In the configuration picker, select + Add new configuration.
- In the New MCP server configuration dialog, choose the server from the dropdown.
- Enter the configuration name in the top-level name field.
- Fill in the collapsible Params and Sources sections. Sources resolve from the selected server, so they are available while you create a configuration, not only when editing one later.
Point a tool at a specific Knowledge
Some tools take a knowledge-reference parameter (knowledgeId / knowledge_id) to say which Knowledge they should act against. Rather than asking you to paste a raw ID, this parameter renders as a searchable knowledge dropdown.
- In the Add tool dialog, find the knowledge-id parameter.
- Set its mode to Manual to override it, or leave it on Auto / Default to let the agent resolve it.
- Open the dropdown and filter by name to find the Knowledge you want. The touchpoint's knowledges are shown by name and resolved to their id behind the scenes.
Because knowledge IDs are never surfaced in the UI, this dropdown is the supported way to pick a Knowledge for a manual override — there is no need to type an ID by hand. The same auto/manual/default modes and validation as the other tool-parameter controls apply.
Result
Your touchpoint now controls its own access through the Allow anonymous access toggle, starts from the platform's default conversational model unless you pick one yourself, presents a nested Tools view grouped by MCP server and configuration, decides through When to ask for confirmation which calls need a human to approve them, and lets you add tools either one at a time or in bulk with defaults inherited. Knowledge-id parameters are filled from a searchable dropdown instead of raw IDs — so the agent has exactly the tools and references it needs to answer against your Knowledge.