Custom views
A Knowledge ships with two built-in ways to look at its resources — the graph view and the attribute view — but those are not the only shapes your data can take. Custom views let you build your own visualizations of the same resources — a map, a card wall, a timeline, a chart — and switch to them from the knowledge page just like the built-ins. This guide covers turning built-in views on and off, creating custom views, writing or generating their code, and using them.
A view is one way of presenting a Knowledge's resources. Built-in views (Graph and Attributes) come with every Knowledge. Custom views are ones you create: each is a small, self-contained visualization that receives the Knowledge's resources and relations as data and renders them however you like. All the enabled views for a Knowledge appear together in the view switcher at the top of the knowledge page.
Prerequisites
Before you start, make sure you have:
- Administrative access: an account with Knowledge management privileges.
- A Knowledge to work in: open the Knowledge tab from the main navigation and select the card for the Knowledge you want to manage.
- A few resources in the Knowledge: a custom view is only as useful as the data it draws, so add some resources first — see Manage knowledge resources.
Switch between views
On the knowledge page, the view switcher sits in the header. It replaces the old pair of graph/attribute buttons with a single dropdown that lists every enabled view — the built-ins first, then your custom views — while the Files button stays on its own beside it.
- Open a Knowledge and look at the header.
- Open the view dropdown (it shows the name of the current view).
- Choose any enabled view to switch to it. The Files button is separate and always shows the Knowledge's input files.
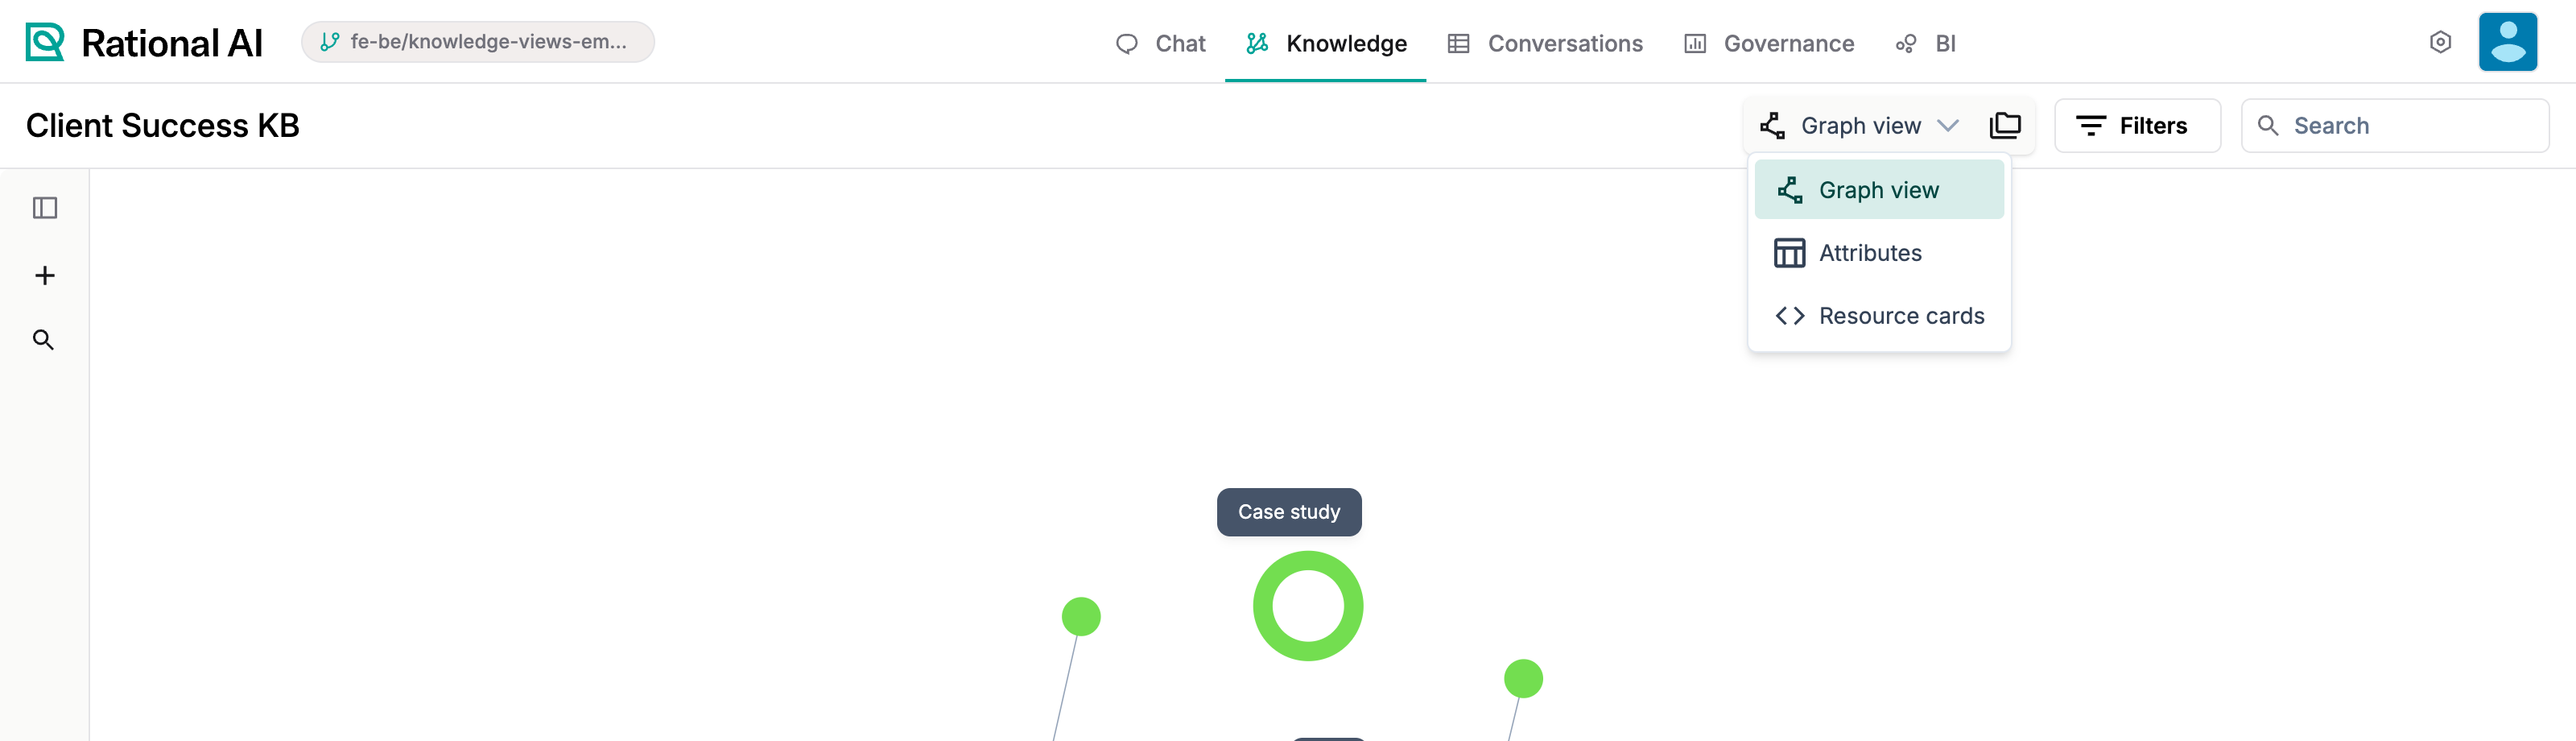
The view switcher: enabled built-in and custom views in one dropdown, with Files kept separate.
See a view fullscreen
A graph or a dense custom view is hard to read in a pane sharing the screen with the chat. The fullscreen toggle beside the view selector expands the current view across the whole application viewport, hiding the chat panel and the splitter while keeping the view's own toolbar available.
Leave fullscreen by selecting the toggle again or by pressing Escape.
The control appears only for the views you can select — graph, attributes, and your custom views. Files doesn't get it.
Spot recently added Knowledges
A Knowledge that has never been edited since it was created carries a New tag in the list, so a fresh import stands out among the ones you've already worked on.
New isn't a countdown. It's shown while a Knowledge's last-updated time still matches its creation time — so it disappears the first time the Knowledge changes, however long that takes, and persists indefinitely on one nobody has touched.
Read it as untouched since import rather than created recently.
Manage views in settings
Everything about views is configured on the Views tab of the Knowledge settings.
Open the Knowledge, go to its settings, and select the Views tab. You'll see two sections:
- Built-in views — Graph view and Attributes list, each with an on/off toggle.
- Custom views — the views you have created, each expandable into a code editor.
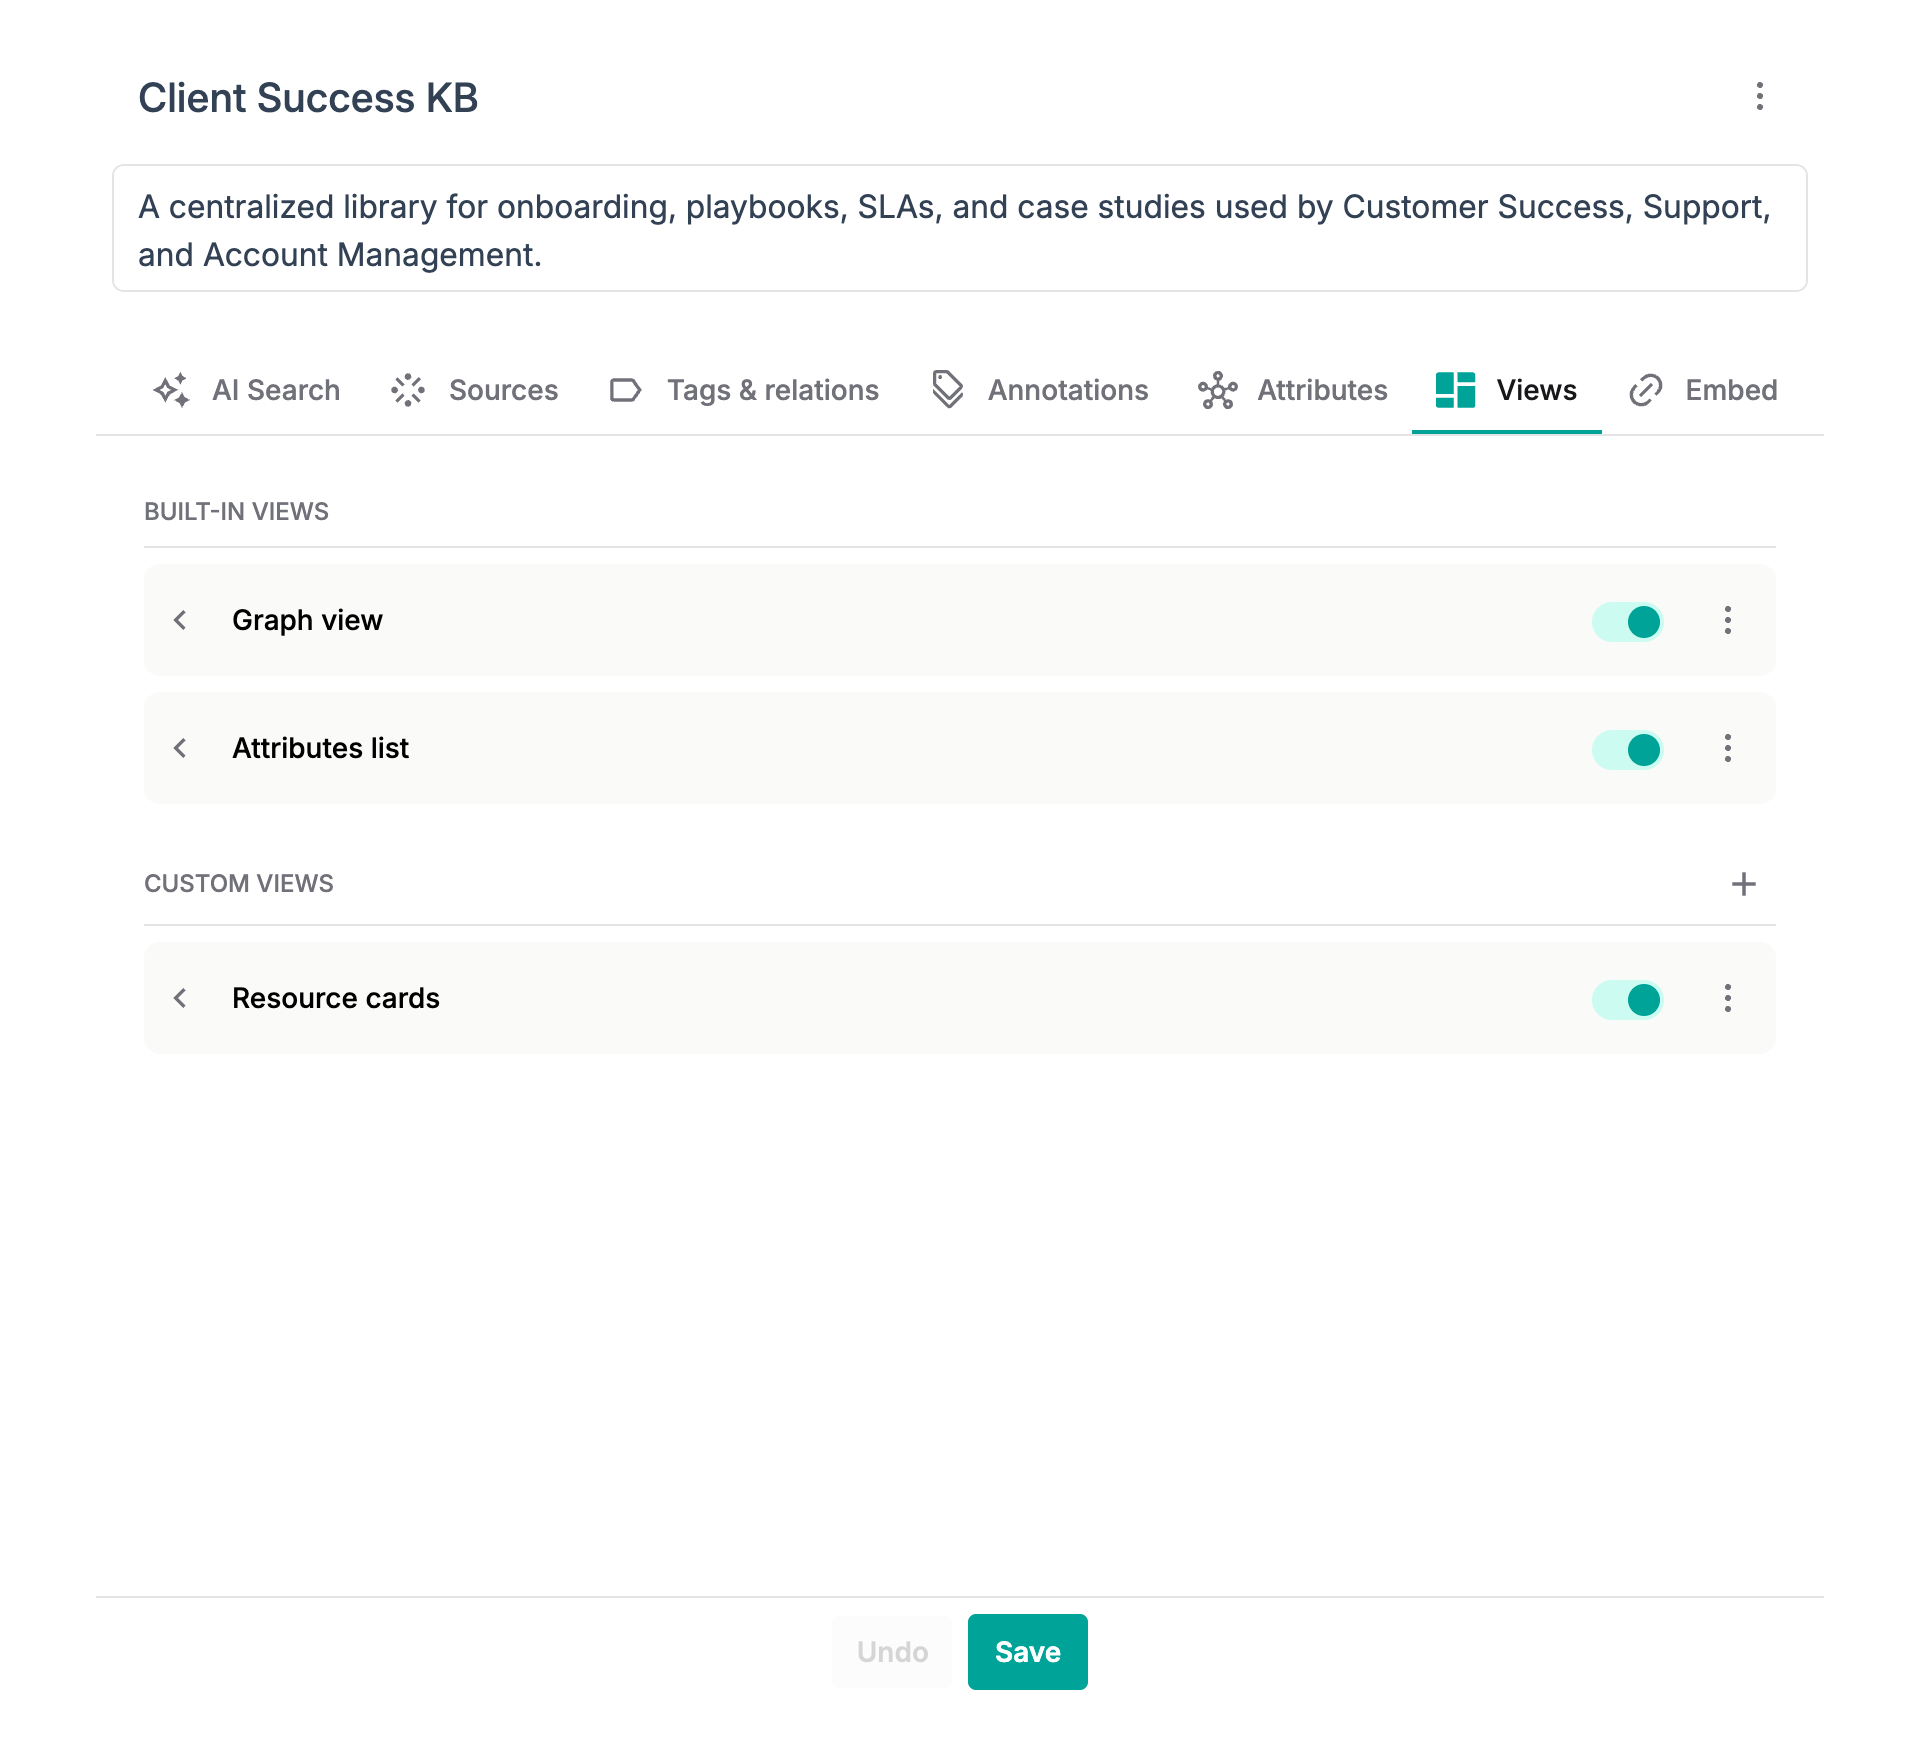
The Views settings tab: built-in toggles above, custom views below.
Turn a built-in view on or off
Hiding a built-in you never use keeps the switcher short.
- On the Views tab, find Graph view or Attributes list under Built-in views.
- Use its toggle to enable or disable it. Disabled views disappear from the switcher on the knowledge page immediately.
Toggling the built-ins only affects the view dropdown. The Files button is fixed and is never part of the views list, so your input files are always one click away.
Create a custom view
A custom view starts from a name and an engine, then a bit of code.
- On the Views tab, select + in the Custom views header.
- Give the view a name.
- Choose an engine — this is the technology your view's code is written in:
- Plain HTML + JavaScript — one self-contained HTML document. The simplest option.
- React (JSX) — a React component, compiled for you in the browser.
- Web Component — a custom element you host yourself, pointed at by a URL.
- Confirm. The new view is created from a small starter template and opens in the editor, ready to edit.
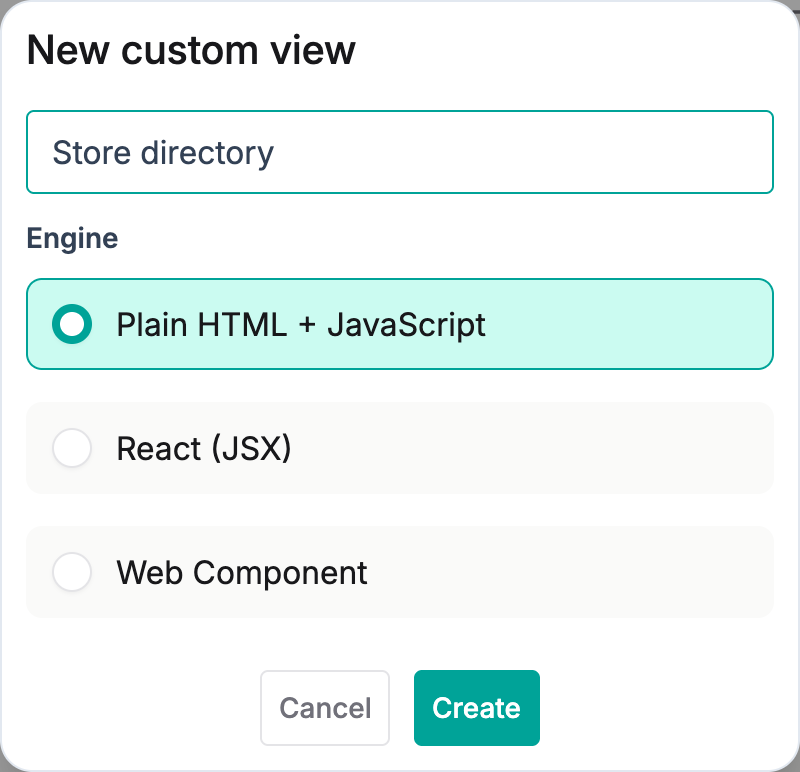
Creating a custom view: pick a name and one of the three engines.
Whatever the engine, your view is handed the Knowledge's data at runtime: an object with the knowledge (name and description), its resources (name, category, tags and attributes), and the graph (nodes and edges). An HTML or React view receives it in a message; a web component receives it as a property. Your code decides how to draw it.
Edit and save a view's code
Expanding a custom view reveals its code editor and a save bar.
- On the Views tab, select a custom view's chevron to expand it.
- Edit the code in the editor (it has syntax highlighting and line numbers).
- Select Save to persist your changes, or Cancel to discard them and collapse the view.
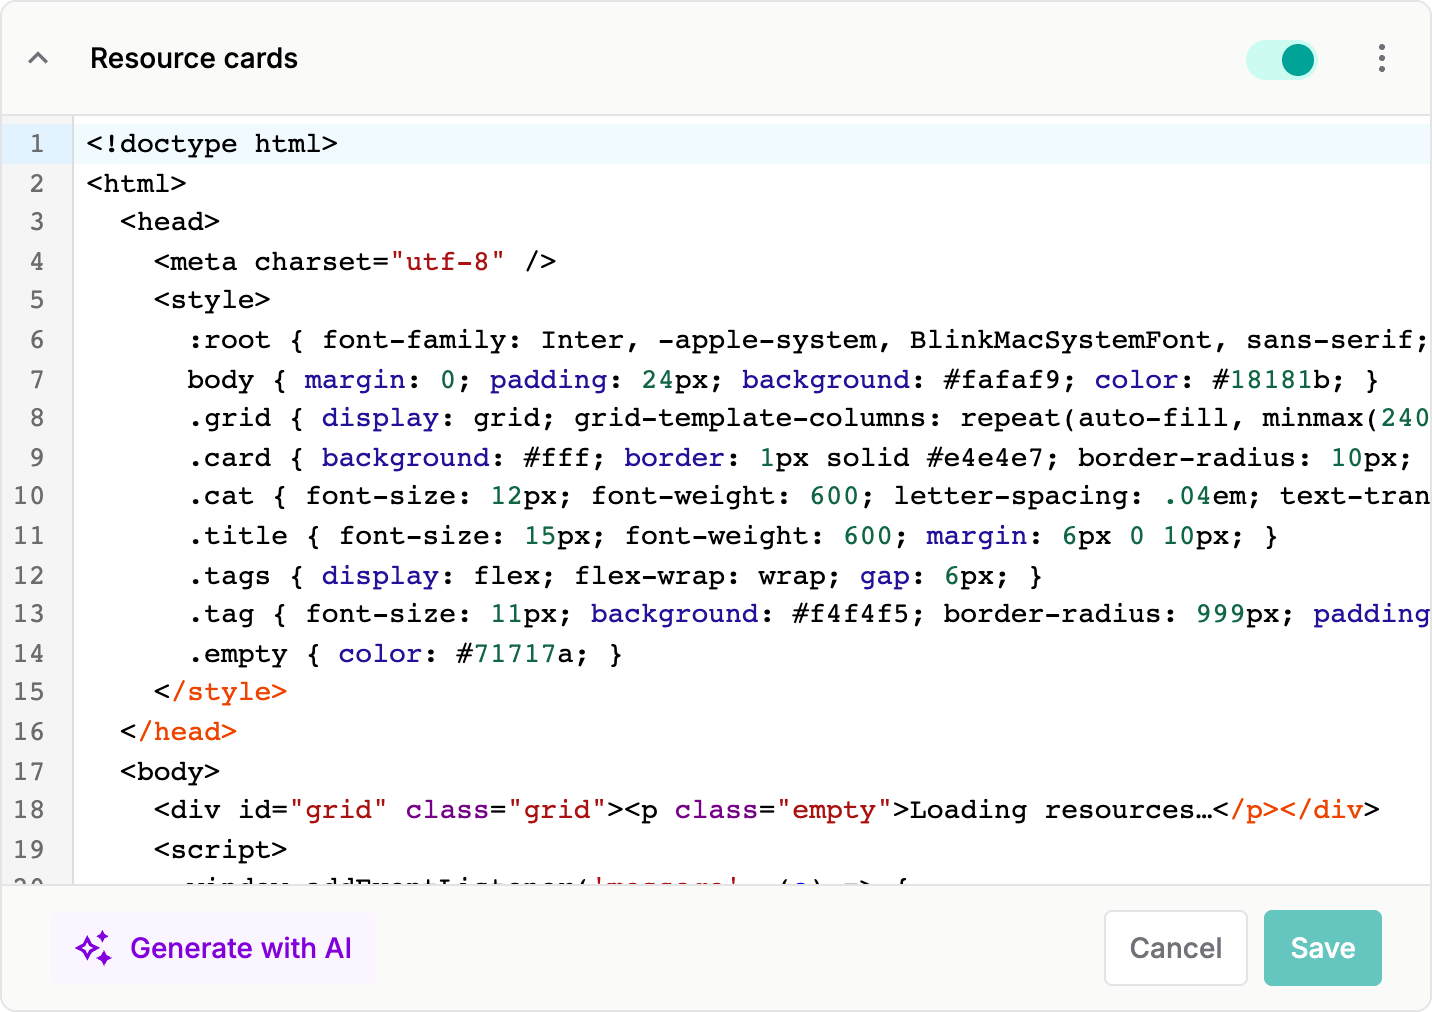
The custom-view editor with the save bar: Generate with AI, Cancel and Save.
Generate a view with AI
If you'd rather describe a view than write it, let the model draft the code for you.
- With a view expanded, select Generate with AI.
- The model writes code for the view's engine, using the Knowledge's real attributes, categories and sample resources as context, and drops it into the editor.
- Review the generated code, then select Save to keep it. Generation never saves on its own — you always confirm.
Generate with AI calls the workspace's default conversational model. If no such model is configured, the action reports a clear error instead of failing silently — configure a model and try again.
Rename, preview, copy or delete a view
Each custom view's ⋮ (kebab) menu holds the rest of its actions:
- Rename — change the view's name.
- Preview — jump to the view rendered on the knowledge page.
- Copy code — copy the view's source to the clipboard.
- Delete — remove the view (after a confirmation).
Use a custom view
Once a view is enabled it behaves exactly like a built-in.
- Go to the knowledge page and open the view dropdown.
- Select your custom view. It renders in the main area, fed with the Knowledge's live resources and graph.
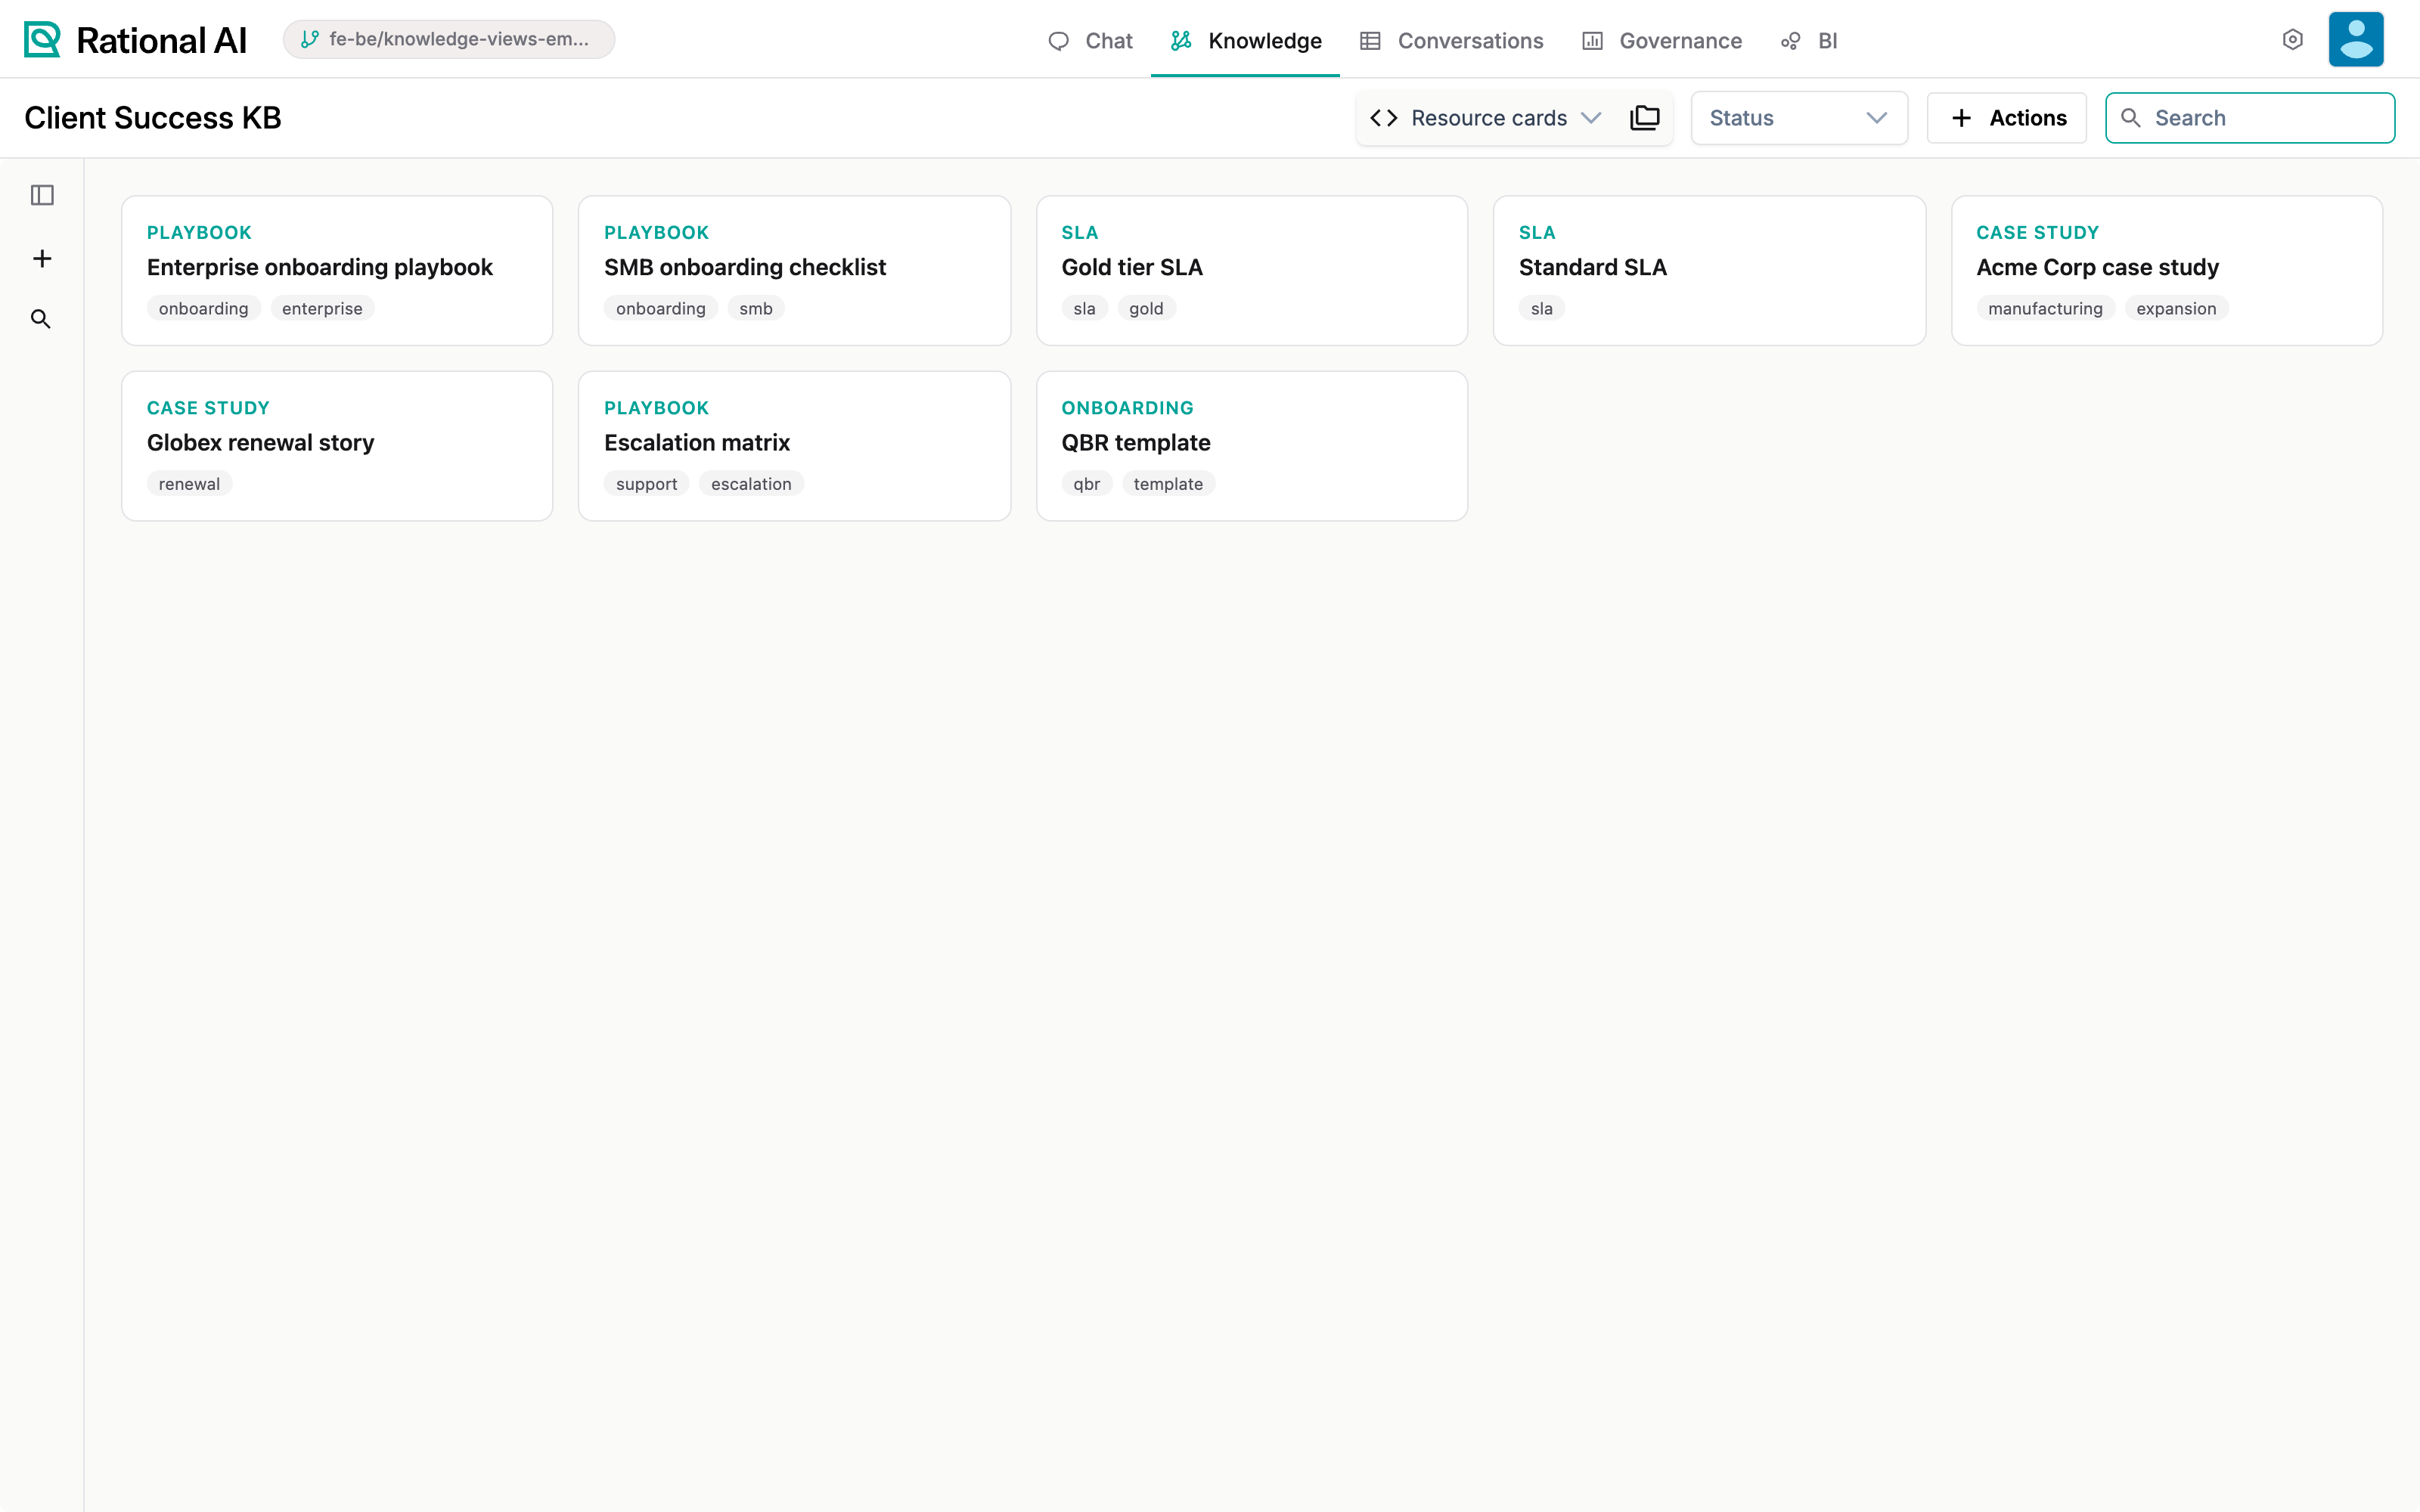
A custom view running on the knowledge page, drawing the Knowledge's own resources.
HTML and React views run in a sandboxed frame, isolated from the rest of the app, so a view can load libraries it needs without affecting your session. Web components are loaded directly and are meant for elements you host and trust.
Result
You can now shape a Knowledge into whatever view fits the job: keep or hide the built-in Graph and Attributes views, create custom views in HTML, React or as a web component, write their code by hand or generate it with AI, and switch between all of them from the header — while the Files view stays right where it is.
To share one of these views, or a chat over the same Knowledge, on a website of your own, see Embed a Knowledge.